All About Transfers
The transfers process
If both the previous and new school use CPOMS, once the student(s) officially leave/ move school and their UPN is added identically at both schools (within the MIS) the transfer between CPOMS will be detected automatically. (Assuming the student has incidents logged against them)
Once detected, the new school will receive a notification to ‘Request’ the transfer at their side – within their ‘Admin’ area > ‘Transfers’ tab.
On request, the previous school will receive a similar notification, this time to ‘Authorise’ the transfer at their side – again within the ‘Admin’ area > ‘Transfers’ tab.
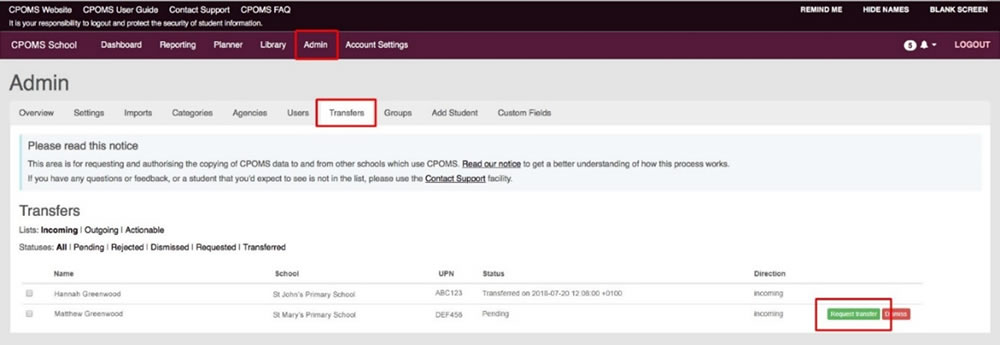
Once the previous school clicks to authorise, the new school will receive the students full incident history, and any attached documentation/ files within their document vault.
Transfer Preferences
Each school may apply their own preferences so that only certain categories are transferred. This can be set by an Admin Key Holder within the schools ‘Admin’ area > ‘Transfers’ tab by clicking on the ‘Manage Preferences’ button (to the right-hand side of the screen). Simply tick the categories that you would like to transfer, and choose to ‘Update Preferences’.
What information is transferred via CPOMS?
Once a transfer has been requested by the student’s new school, and authorised by their previous school the student’s full incident history, plus any files/ documentation within their document vault will be sent across to the new school. If you have set transfer preferences for your school, only the chosen categories will be sent.
Any linked student names to the left of the incident text will be hidden.
The incident text however, will send on (transfer) exactly as it is written.
Before authorising a transfer, we would always suggest that you double check the students ‘Incidents’ tab and document vault to ensure that all required names are removed from the text. If you do then find a name that you need to alter you can choose to ‘Edit’ the text of the incident to use initials for any names, or use a different term such as mum/ dad/ sister/ brother for example.
Once you are happy with the incident text and documentation you may click to authorise the transfer.
How to access transfer information
Once the transfer status changes to ‘Transferred’, the new school will receive the students full transfer information.
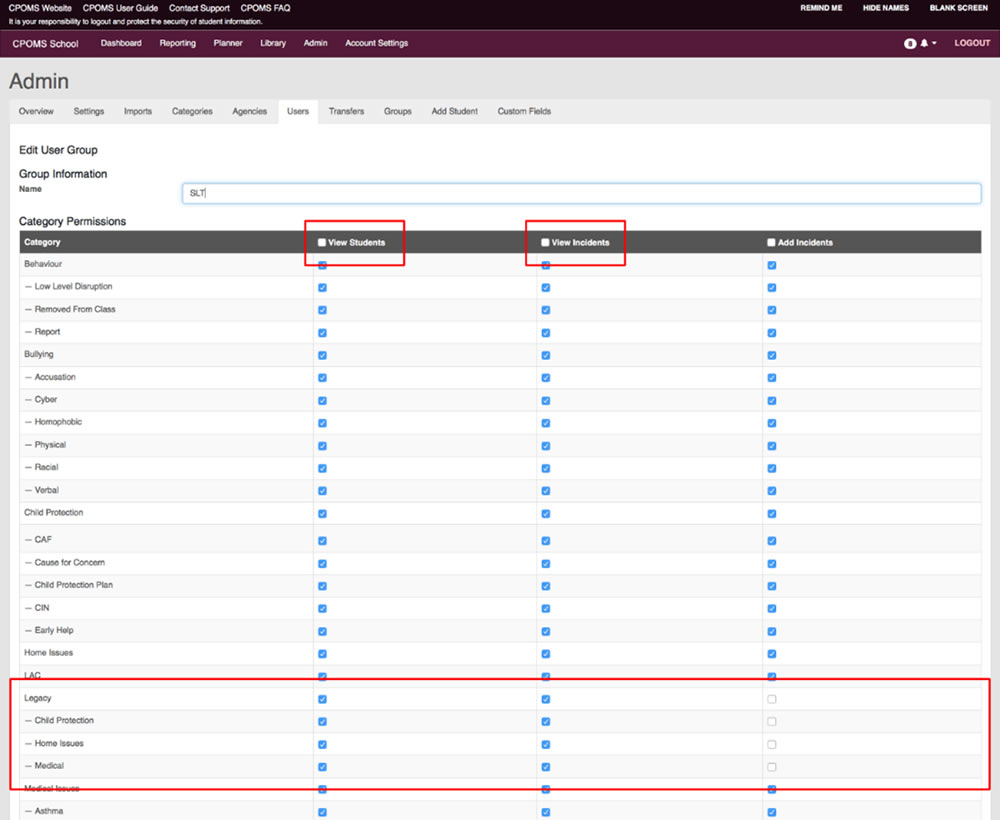
The schools/ students previous incident categories are brought across to CPOMS also, under a main category of ‘Legacy’, with sub-categories of the previous schools category name.
The Legacy categories are automatically deactivated, and the permissions are set to blank, to ensure that no new incidents can be logged against them and that only the correct level of staff at the new school can access the transferred information.
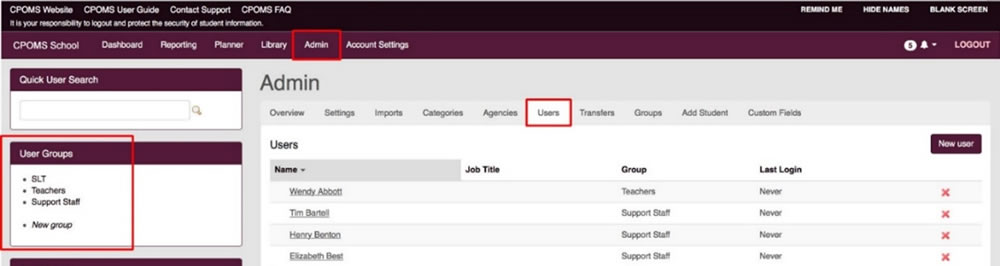
Therefore in order to gain access to the transferred information, an Admin key user needs to set the permissions for each Legacy category, and any sub-categories within the ‘Admin’ area > ‘Users’ tab, by clicking into the top level User Group name, i.e. SLT, to the right-hand side of this page.
Within the User Group ‘Category Permissions’ please tick ‘View Students’ and ‘View Incidents’ against each Legacy category, and any sub-categories, ensuring you ‘Save Group’ once ticked.
Please leave the ‘Add Incidents’ column un-ticked, and all of the Legacy categories de-activated so that no new incidents can be logged against them.
Once the category permissions have been switched on, the transferred information will appear within the students profile > ‘Incidents’ tab in date order, and any files within their ‘Document Vault’ tab.
Transfer FAQs
A transfer is not showing for me to request/ authorise?
If a transfer is not showing to request, it is worth checking that the child has been added to your MIS with a current start date and accurate UPN number (which is the same UPN as the other school), and also that the child has been archived at the other school.
Please note, the new school must firstly request the transfer to start the process.
The new school does not use CPOMS?
If a students new school does not use CPOMS, you can run a full student report, and either print a hard copy or send on electronically.
Please see below instructions to run a full student report:-
- To run a full student report, access the child’s profile via their class list, or using the ‘quick student search’ and click into their name.
- Select the ‘Student Report’ tab and tick the ‘Incidents’ check box to ‘Include in report’.
- In the additional filter options that appear, you may wish to also tick ‘Include Linked Incidents’ to ensure that you receive anything the student has been linked in to.
- To print all records please ignore the further additional filter options, or you may apply specific dates or select certain categories here.
- Scroll down to the ‘Report Format’ and amend this to ‘Print View (PDF)’ and finally ‘Generate Report’. This will then generate a PDF copy of the child’s incidents which you can then print or save electronically.
- You can run all reports within CPOMS in ‘Enquiry View’ to view the report on screen or ‘PDF (Print View)’ to create a printable PDF copy.